Download a PDF version of this article.
This technical update provides additional guidance on cavity separating walls and gable walls: the use of lateral restraint. It is important that all workmanship carried out during construction is completed in accordance with the relevant tolerances.
Lateral restraint is needed to restrict movement of the separating or gable wall. It is assumed the leaves of a cavity wall are adequately tied together. It is important to get this detail right first time as remedial or post-construction installation rarely provides the necessary fixity.
Details: Separating walls, at roof level, fall into three main categories:
1. Where rafters are level or within 300mm (vertically) on each side of the wall, packing the rafters either side of the wall tight to the masonry on both sides will be satisfactory. If straps are to be used these should be:
a. no more than 2m apart for dwellings up to 3 storeys
b. no more than 1.25m apart for dwellings over 3 storeys
Straps should be in line or nearly in line on each side of the wall and fixed across at least three rafters.
2. Separating walls with rafters greater than 300mm apart (vertically) on each side of the wall should be provided with restraint straps as for an exposed gable.
3. Separating walls with horizontal staggers (in plan) between two dwellings, should be provided with restraint straps.
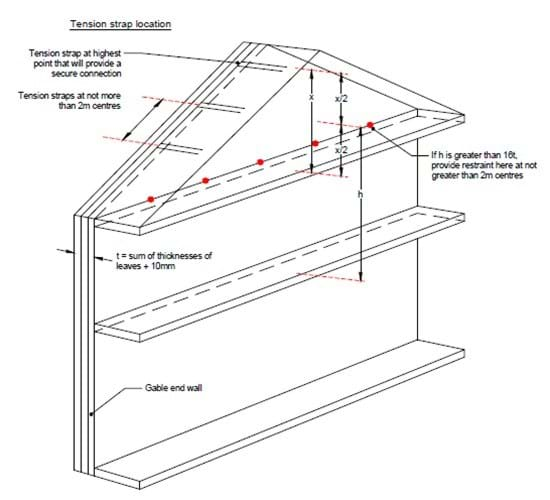
Lateral restraint is only required at ceiling level where the height (h) from the top floor level (not including room in roof) and ½ the roof height exceeds 16 times, plus 10mm, the thickness of the separating wall.
Restraint to gable walls should be provided at rafter level at all times and at ceiling level where the height (h) from the top floor level (not including room in roof) and ½ the roof height exceeds 16 times, plus 10mm, the thickness of the wall to be restrained.
Where a gable ladder is being used to provide lateral restraint to the gable wall (instead of restraint straps) it is acceptable to use the longitudinal trussed rafter bracing instead of blocking between the last trussed rafter and the wall, the bracing should be tight against the wall. Additional intermediate boards will need to be provided if longitudinal bracing is more than 2m apart. These should be tight against the wall and fixed over at least three trussed rafters. In all cases where the gable ladder is providing restraint, the gable soffit board should be cut carefully against the outer face of the wall and fixed securely.
If in doubt check the design, however where this is lacking refer to Approved Document A of the Building Regulations and the guidance above. Lateral restraint straps can be referred to as tension straps. In addition, BRE provide good building guides, specifically relating to lateral restraint.
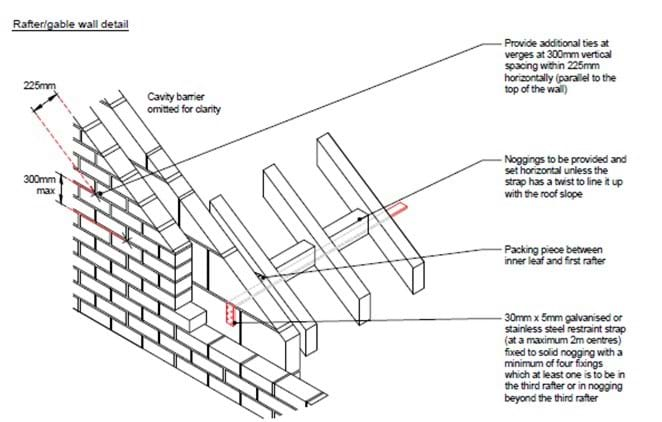
Lateral restraint straps should:
1. Be galvanised with a minimum cross-section of 30mm x 5mm
2. Hooked over a solid block. Note: screw fixing to face of blocks is not acceptable.
3. Have noggins between rafters/joists with packing between the wall and first member.
4. Straps should span a minimum of three rafters/joists with at least one fixing in the third member.
5. Alternatively, fix straps to the longitudinal bracing, provided straps are at centres not exceeding 2m.
Read more technical articles on the Resource Hub or sign up to receive our blog round-up.
Every care was taken to ensure the information in this article was correct at the time of publication. Guidance provided does not replace the reader’s professional judgement and any construction project should comply with the relevant Building Regulations or applicable technical standards. For the most up to date Premier Guarantee technical guidance please refer to your Risk Management Surveyor and the latest version of the Premier Guarantee Technical Manual.